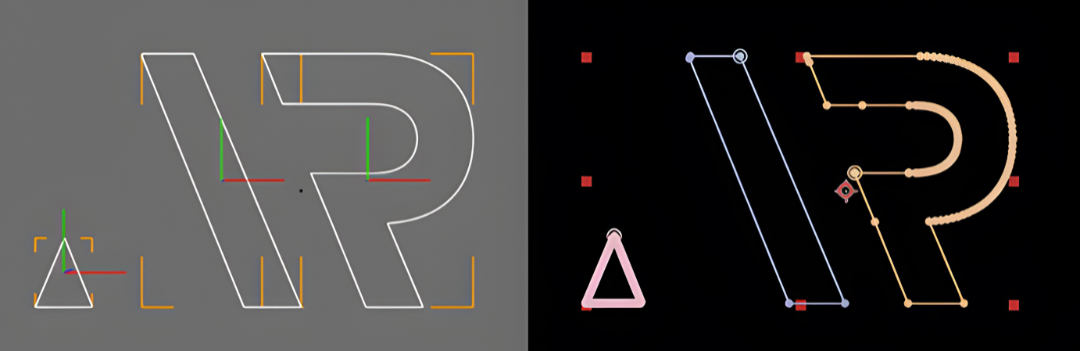
Transfer animated splines from Cinema 4D to After Effects masks. There are two scripts: the first one is for exporting AI file sequence from Cinema 4D. The second script is for importing AI file sequence and converting it to single solid layer with mask paths in After Effects. Export script uses Cinema 4D’s ‘Sketch and Toon’ module so you need it to run export script. Cinema 4D script is tested with R19 and R20. After Effects script is tested with CC 2018.

Warning 1. The import script is super slow if you have many points. Try to use as minimum point count as you can! Tweak ‘Intermediate Points’ settings in Cinema 4D.

Warning 2. It is recommend that you export only one spline at a time since masks can easily get mixed up. But if that does not matter, then don’t care.

Exporting (C4D)

  1. Select spline objects you want to export
  2. Set the preview range to match what frames you want to export
  3. Run the script (c4d-splines-to-ae-masks-part1.py)
  4. Select folder where you want to save AI file sequence

Importing (After Effects)

  1. Run the script (c4d-splines-to-ae-masks-part2.jsx)
  2. Select folder to export AI file sequence
  3. Insert frame rate that you used in Cinema 4D
  4. Wait until the script is done (it may take a long time)

Special thanks to @lasse_lauch for testing.

Updated 04/10/2018
> Added script for After Effects CS6

Updated 06/04/2019
> Added progress status for import script (CC version)

Updated 24/08/2019
> Added export script that creates separated folders for each spline object
> Added import script that imports to shape layers instead of masks

Updated 04/10/2020
> Link updated

Export
AR_Scripts / AR_ExportSplineSeq.py

Import
ar_c4dsplinestoaemaskspart2(CC).jsx (Solid layer with masks)
ar_c4dsplinestoaeshapespart2(CC).jsx (Shape layer with shape paths)

After Effects, Cinema 4D, JavaScript, Python

Connect two X-Particles xpEmitters with splines with this Python Generator. You can also tweak amount of connections and spline interpolations.

You can also connect two xpEmitters using xpElektrix by setting Mode to ‘Particle to Particle’.

import c4d, xparticles
from c4d import utils as u

def main():
    connect = c4d.BaseObject(1011010) # Initializ connect object
    connect[c4d.CONNECTOBJECT_WELD] = False # Untick weld checkbox
    emittera = xparticles.ToEmitter(op[c4d.ID_USERDATA,1]) # Emitter A link
    emitterb = xparticles.ToEmitter(op[c4d.ID_USERDATA,4]) # Emitter B link
    connections = op[c4d.ID_USERDATA,2] # Amount of connections
    interp = op[c4d.ID_USERDATA,3] # Iterpolation for spline
    offset = op[c4d.ID_USERDATA,8] # Offset connections
    splines = [] # Initialize list for splines
    pca = emittera.GetParticleCount() # Get Emitter A's particle count
    pcb = emitterb.GetParticleCount() # Get Emitter B's particle count
    if pca > pcb: # If Emitter A's particle count is larger than Emitter B's
        op[c4d.ID_USERDATA,6] = str(pcb) # Maximum amount of connections
        tpc = pcb # Particle count to use
    else: # Otherwise
        op[c4d.ID_USERDATA,6] = str(pca) # Maximum amount of connections
        tpc = pca # Particle count to use
    try: # Try to execute following script
        for i in range(connections): # Loop through connections count
            points = [] # Initialize list for points
            if op[c4d.ID_USERDATA,10] == True: # If modulo checkbox is ticked
                offset = offset%tpc # Offset with modulo
            pa = emittera.GetParticle(i+offset) # Get Emitter A's particle index
            pap = pa.GetPosition() # Get Emitter A's particle's position
            pb = emitterb.GetParticle(i+offset) # Get Emitter B's particle index
            pbp = pb.GetPosition() # Get Emitter B's particle's position
            for k in range(interp): # Loop through interpolation count
                r = u.RangeMap(k, 0, interp, 0, 1, True) # Range map
                pp = u.MixVec(pap, pbp, r) # Get point's final position
                points.append(pp) # Add point to points list
            points.append(pbp) # Add last point
            spline = c4d.SplineObject(interp+1, c4d.SPLINETYPE_LINEAR) # Initialize spline object
            splines.append(spline) # Add spline to splines list
            splines[i].SetName("Spline"+str(i)) # Set name for spline object
            splines[i].SetAllPoints(points) # Set points to spline
            splines[i].InsertUnder(connect) # Insert spline under connect object
    except: # If something went wrong
        pass # Do nothing
    return connect # Return connect object that contains splines

Updated 16/10/2018
> Added offset option

ar_generator_connect_xpemitters.c4d v1.0.0 (2023.1.0)

Asset, Cinema 4D, Generator, Python, X-Particles

Controlling TurbulenceFD’s wind and buoyancy direction parameters with default vector input is not very intuitive. I made more artist friendly tool with Xpresso and Python so you can rotate spline object to aim direction for wind and buoyancy.

import c4d
from c4d.utils import SplineHelp

def main():
    global Vector # Output variable
    sh = SplineHelp() # Get a new spline help object
    sh.InitSpline(Spline) # Initialize spline help with object
    Vector = sh.GetNormal(0) # Get a normal vector

ar_xpresso_tfd_direction_tool.c4d v1.0.0 (2023.1.3)

Asset, Cinema 4D, Python, TurbulenceFD, Xpresso

This Delete Python Effector hides clones completely by toggling clone’s visiblity, instead of scaling them to zero. There are three different modes to play with.

Delete by index effector
Hides clones by given index number or range. Indexes are separated with commas (,) and ranges are pointed with dashes (-). You can also invert the final output.

Delete by scale effector
Hides clones (visibility) based on clone’s scale parameter (not size). This helps to get rid off too tiny or too big clones when you are randomizing clones’ scale with e.g. random effector.

Delete random effector
Hides clones randomly. You can change seed to randomize which clones are deleted, change amount of deleted clones and invert the final output.

Updated 20/11/2022:
> Semantic versioning

Updated 24/04/2023:
> Added modulo feature

Updated 25/05/2023:
> Bug fix

ar_effector_delete.c4d v1.2.2 (2023.1.2)

Cinema 4D, Effector, MoGraph, Python

This script is for Blackmagic Fusion. With this script you can easily view different versions. You can load newer version, older version, latest version or custom given version. You need to install Python 2.7 64-bit version to use this script with Fusion. The script scans folder so it can jump over versions that are missing (e.g. from v02 to v05).

Place the script to comp folder:
“C:\Users\[USER]\AppData\Roaming\Blackmagic Design\Fusion\Scripts\Comp”

Script uses “_v” as a version delimiter.

Your filepath should be something like this:
“..\Versions\MyProject_v001\Passes\MyProject_v001_diffuselighting_####.exr”
So next version path looks like this:
“..\Versions\MyProject_v002\Passes\MyProject_v002_diffuselighting_####.exr”

Path structure is very important. It should not change.

ar_versionup.py

Fusion, Python

This is my first Cinema 4D plug-in. Originally I made it for Xpresso heavy users. This plug-in makes changing node’s color easy. Just select nodes and click what color you want to use. You can also load and save custom color palettes. You can also colorise objects and add objects to layers. Plug-in works also with Redshift shader graph editor’s nodes.

When you are chaning Xpresso node colors, Xpresso tag has to be selected, otherwise plug-in wont colorise nodes. And when you are changing Redshift nodes, the Redshift material has to be selected. Also make sure that you have enabled these in the options (File > Options)!

Installation:
Place Colorise plug-in to your appdata plug-in folder to make it work properly (avoid permission errors), since plug-in has to write and read presets and options files.

Win: “C:\Users\[USER]\AppData\Roaming\MAXON\Cinema 4D R[VERSION]\plugins\”
Mac: “/Users/[USER]/Library/Preferences/MAXON/CINEMA 4D R[VERSION]/plugins”

Commands: (Keymofidier, Button)
Alt + [Color]: Select items with this color
Alt + Shift + [Color]: Add to selection items with this color
Alt + Ctrl + [Color]: Remove from selection items with this color
Ctrl + [Color]: Group selected objects under null and assign layer for selected objects
Shift + [Color]: Set objects layer to this colored layer
Shift + [X]: Remove selected objects’ layer
Alt + [X]: Sequence colors to selected items
Ctrl + [X]: Random colors to selected items

Thanks to @BachtellDesign and @_james_owen_ for new feature ideas.

N.B. Known bug in R25, color picker in Color Chooser doesn’t work at the moment. Use color picker in main layout. Hopefully Maxon will fix this bug.

Updated 08/09/2019 (v0.5)
> R21 version – completely rewritten plug-in with new features and bug fixes

Updated 11/09/2019 (v0.5.1)
> Added option to colorise lights
> Improved Redshift node handling

Updated 12/10/2019 (v0.5.2)
> Added support to make polygon selections
> Fixed Redshift node-editor bug

Updated 14/03/2021 (v0.5.3)
> Cinema 4D R23 support

Updated 31/10/2021 (v0.5.5)
> Cinema 4D R25 support
> Horizontal layout is back
> Option to hide and show color pickers
> Support to import colors from coolors.co and colorhunt.co urls
> Support to colorise Redshift lights
> Added option to ignore black color

Updated 04/11/2021 (v0.5.6)
> Fixed bug that broked the plug-in older than C4D R25 versions

Updated 23/02/2024 (v1.0.0)
> Added option to colorise selected layers
> Added option to change palette color count (min 4 – max 42)
> Added option to generate palette from custom gradient
> Added option to remember current color palette on exit

colorise_v0.4.6_r20.zip (R20) (Depricated)
colorise_v0.5.6.zip (R21-2023) (Depricated)
colorise_v1.0.0.zip (2024)

Cinema 4D, Plug-in, Python, Redshift, Xpresso

This is simple Python Effector that piles clones top of each other. It supports random effectors scale y parameter. It uses clone’s original object’s bounding box to get correct height. It needs primitive or polygon object to work. You should use it only with cloner. Pile Up Effector does not support rotation.

Updated 23/02/2023
All kind of new advanced features
> Uses GetBBox instead of GetRad

ar_effector_pile_up.c4d v1.73.1 (2023.1.3)

Cinema 4D, Effector, MoGraph, Python

Take Control Effector takes control over selected clone. Select clone ID and then clone is linked to the Effector. When you move the Effector, clone moves with it in Effector’s coordinate space.

Besides changing PSR, you can also modify clone (works only with Cloner object), set custom clone weight, or change clone color. Take Control Effector works properly with Cloner object when ‘Fix Clone’ checkbox is ticked. There is also checkboxes to activate/deactivate position, scale and rotation linking in ‘Matrix’ group.

Cloner’s ‘Random’ mode is not supported, it glitches Take Controller’s ‘Clone Select’ feature. To randomize clones use Random Index Effector.

There is handy ‘Go To Origin’ button that moves effector to clone’s original position (before this effector is calculated).

Warning! There is a bug in C4D (at least in R20.059) with Fracture Object. You can fix this putting Plain Effector before Take Control Effector to Fracture Object and then adjusting ‘Weight Transform’ parameter (just drag it around). After that you can delete Plain Effector.

To use ‘Offset’ mode, the effector has to be parented to object with same matrix as the Cloner has.

Updated 23/02/2023
> Semantic versioning

ar_effector_take_control.c4d v1.4.1 (2023.1.3)

Cinema 4D, Effector, MoGraph, Python

I’m currently working with one project where I mess with OBJ sequences (recorded with Brekel Pro PointCloud), so I created a script that loads OBJ files from a folder and a Python Tag that plays through objects making them visible and invisible depending the current frame.

Import obj folder

import c4d, os
from c4d import storage as s
def main():
    extensions = ["obj"] # File extensions that will be imported
    folder = s.LoadDialog(c4d.FILESELECTTYPE_ANYTHING,'Select folder to import',c4d.FILESELECT_DIRECTORY,'') # Load folder
    if not folder: return # If there is no folder, stop the script
    files = os.listdir(folder) # Get files
    for f in files: # Loop through files
        ext = f.rsplit(".",1) # Get file extension
        if ext[1] in extensions: # If extension matches
            p = os.path.join(folder, f) # Full file path
            c4d.documents.MergeDocument(doc, p, 1) # Merge file to current project
    c4d.EventAdd() # Update Cinema 4D
if __name__=='__main__':
    main()

OBJ Sequence Player

This is Python Tag with some custom constrols on it. You can change starting frame, reverse sequence and animate manually with custom mode. Controls are in Python Tag.

import c4d

def main():
    frame = doc[c4d.DOCUMENT_TIME].GetFrame(doc[c4d.DOCUMENT_FPS]) # Get current frame
    obj = op.GetObject() # Get object
    children = obj.GetChildren() # Get children
    index = 0 # Initialize index variable
    run = 0 # Initialize run variable

    rev = op[c4d.ID_USERDATA,2] # User data: Reverse sequence
    start = op[c4d.ID_USERDATA,3] # User data: Starting frame
    holdf = op[c4d.ID_USERDATA,4] # User data: Hold first frame
    holdl = op[c4d.ID_USERDATA,5] # User data: Hold last frame
    manon = op[c4d.ID_USERDATA,7] # User data: Activate manual mode
    manfr = op[c4d.ID_USERDATA,8] # User data: Set manual frame

    if manon == False: # If manual mode is off
        if rev == False: # If reverse mode is off
            for child in children: # Loop through children
                if frame == index+start: # If index maches with current frame
                    child[c4d.ID_BASEOBJECT_VISIBILITY_RENDER] = 2 # Default
                    child[c4d.ID_BASEOBJECT_VISIBILITY_EDITOR] = 2 # Default
                    run = 1 # Sequence is running
                else: # Otherwise
                    child[c4d.ID_BASEOBJECT_VISIBILITY_RENDER] = 1 # Off
                    child[c4d.ID_BASEOBJECT_VISIBILITY_EDITOR] = 1 # Off
                index = index + 1 # Increase index
        else: # Otherwise
            for child in reversed(children): # Loop through reversed children
                if frame == index+start:
                    child[c4d.ID_BASEOBJECT_VISIBILITY_RENDER] = 2
                    child[c4d.ID_BASEOBJECT_VISIBILITY_EDITOR] = 2
                    run = 1
                else: # Otherwise
                    child[c4d.ID_BASEOBJECT_VISIBILITY_RENDER] = 1
                    child[c4d.ID_BASEOBJECT_VISIBILITY_EDITOR] = 1
                index = index + 1

        if holdf == True and run == 0: # If hold start frame is on
            if frame < len(children)+start: if rev == True: children[-1][c4d.ID_BASEOBJECT_VISIBILITY_RENDER] = 2 children[-1][c4d.ID_BASEOBJECT_VISIBILITY_EDITOR] = 2 else: children[0][c4d.ID_BASEOBJECT_VISIBILITY_RENDER] = 2 children[0][c4d.ID_BASEOBJECT_VISIBILITY_EDITOR] = 2 if holdl == True and run == 0: # If hold last frame is on if frame >= len(children)+start:
                if rev == True:
                    children[0][c4d.ID_BASEOBJECT_VISIBILITY_RENDER] = 2
                    children[0][c4d.ID_BASEOBJECT_VISIBILITY_EDITOR] = 2
                else:
                    children[-1][c4d.ID_BASEOBJECT_VISIBILITY_RENDER] = 2
                    children[-1][c4d.ID_BASEOBJECT_VISIBILITY_EDITOR] = 2
    else: # Manual mode is on
        for i, child in enumerate(children): # Loop through children
            if i == manfr: # If index is same as custom frame
                children[manfr][c4d.ID_BASEOBJECT_VISIBILITY_RENDER] = 2
                children[manfr][c4d.ID_BASEOBJECT_VISIBILITY_EDITOR] = 2
            else: # Otherwise
                child[c4d.ID_BASEOBJECT_VISIBILITY_RENDER] = 1
                child[c4d.ID_BASEOBJECT_VISIBILITY_EDITOR] = 1

ar_tag_obj_sequence_player.c4d v1.0.1 (2023.1.2)

Asset, Cinema 4D, Python

I use a lot of custom assets in every single project. Those assets can be very big MoGraph setups, Xpresso rigs, Python Generators or whatever. That’s why I had an idea to make a little script that merges your asset from absolute file path to your existing project.

Instead searching your asset every time in folders or content browser, you can simply create custom asset with this script and place it to Cinema 4D’s layout.

import c4d

def main():
    doc.StartUndo() # Start recording undos
    path = "C:\\c4d-assets\\my-asset.c4d" # Your asset file path, change this
    flags = c4d.SCENEFILTER_OBJECTS | c4d.SCENEFILTER_MATERIALS | c4d.SCENEFILTER_MERGESCENE # Merge objects and materials
    c4d.documents.MergeDocument(doc, path, flags) # Merge asset to active project
    c4d.EventAdd() # Refresh Cinema 4D
    doc.EndUndo() # Stop recording undos
if __name__=='__main__':
    main()

You can also use this to load models (obj, abc, fbx) or different c4d projects into your active document.
If you use Mac, use “/” instead “\\” (line 5)

Updated 26/03/2019

Cinema 4D, Python